In this article, we will show you how to install Disney Plus addon on Kodi. The same method also works on all Kodi supported platforms such as android mobile, Windows PC, MAC, Firestick, Fire TV cube, etc.
The Disney+ streaming service quickly became one of the best streaming services among the cord-cutters simply because of its massive collection of movies and original series from several popular Disney-owned franchises.
While Disney’s Hulu and ESPN+ streaming services do offer regular movies/TV shows and sports-oriented content respectively, Disney+ stands out for its family-friendly content with zero mature substance. In the last five months, Disney+ subscriber count has surpassed 50 million worldwide.
Although Disney+ is constantly working to make its streaming platform accessible to more users, it is not officially available for legacy devices yet. If you use a cheap Android-powered device for content consumption, then it probably has Widevine L3, which is a DRM software that protects copyrighted content from being illegally distributed.
However, Disney+ requires Widevine L1 certification for streaming, which is a more stringent version of the DRM. It is only found on certified Android TVs/streaming boxes, gaming consoles, and mid-high range smartphones.
Those who don’t own a Widevine L1 certified device won’t be able to stream Disney+ content via the official app or website. Having said that, you can now use Kodi to watch Disney+ movies and TV shows, thanks to the unofficial Disney plus addon for Kodi.
In this guide, we will show you how to install the Disney plus Kodi addon, as well as give you an overview of the add-on so that you can use it properly.
Table of Contents
Features of Disney+ Kodi Addon
- The unofficial Disney Plus addon by Slyguy offers the same exclusive collection of movies, original shows, and documentaries from Disney, Pixar, Marvel, Star Wars, National Geographic, etc.
- It lets you stream Disney+ content in up to 4K resolution, with support for H265 stream, HDR10, and Dolby Vision enhancements.
- The add-on has faster metadata loading for instantaneous navigation between different menus and quicker content playback.
- It is optimized for devices with low-end hardware capabilities. The add-on also lets you select preferred quality, unlike the official Disney+ app.
- Since the add-on requires users to have an active Disney+ subscription, it doesn’t source content from illegal websites.
How to Install Disney Plus on Kodi?
Please keep in mind that whatever content you’re streaming on Kodi is clearly visible to your Internet Service Provider (ISP) and local authorities of your region. Kodi addons & builds offer unlimited free streaming but could also get you in legal trouble if your ISP & government found copyrighted content (Movies/TV Shows/Sports) on your Kodi. Therefore, you must be cautious and use a secure connection while using Kodi.
A VPN will help you in masking your IP address, making it impossible for anyone on the internet to track down your online activities. Not only it helps you maintain your anonymity on the Internet, but it also lets you unblock geo-restricted content. Well, there are quite a lot of VPNs available on the internet to choose from. However, the only one we believe to reliable and wholeheartedly recommend is the IPVanish VPN for Kodi.
IPVanish VPN is one of the most secure and fastest VPN in the industry. Moreover, IPVanish VPN comes with a 30-day money-back guarantee. Click here to Get 46% off IPVanish VPN.
This offer will expire soon.
The Disney+ add-on is developed by a community developer. Hence, it is not available for download in the official Kodi Add-on Repository. Fortunately, Kodi does let users install unofficial third-party add-ons similar to Android. The following set of instructions will show you the simplest method to install the Disney plus addon on Kodi.
The Disney+ Kodi add-on is totally safe to install, in case you are wondering.
Step #1: Enable Third-Party Add-on Installation on Kodi
- First of all, open up the Kodi app on your device if you haven’t done it already. Wait until it boots to the Kodi home screen.
- Click the gear-wheel icon above the sidebar on the left of the Kodi home screen.
- Next, click the System option at the bottom-right corner of the System page.
- Now scroll down the sidebar to highlight the Add-ons label, then toggle the slider next to Unknown sources. It is found under the General.
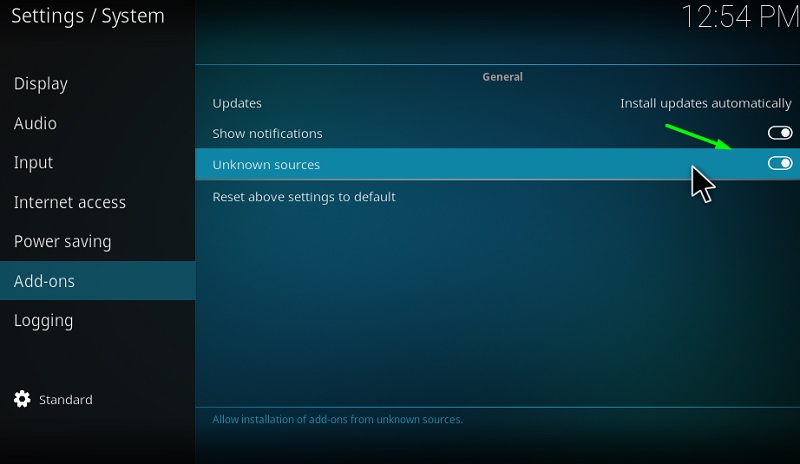
- Click Yes if Kodi prompts a dialog box with a warning message, which warns you about the risks associated with third-party add-on installation.
Once you toggle ON Unknown sources, go back to Kodi’s System page and follow the sub-steps below to install the SlyGuy Repository.
Step #2: Install SlyGuy Repository on Kodi
- On Kodi’s System page, click the File manager.
- Next, click Add source in the File manager’s main directory. A small window should pop-up on the screen.
- Click the <None> option in the small window and enter the following link: http://k.slyguy.xyz
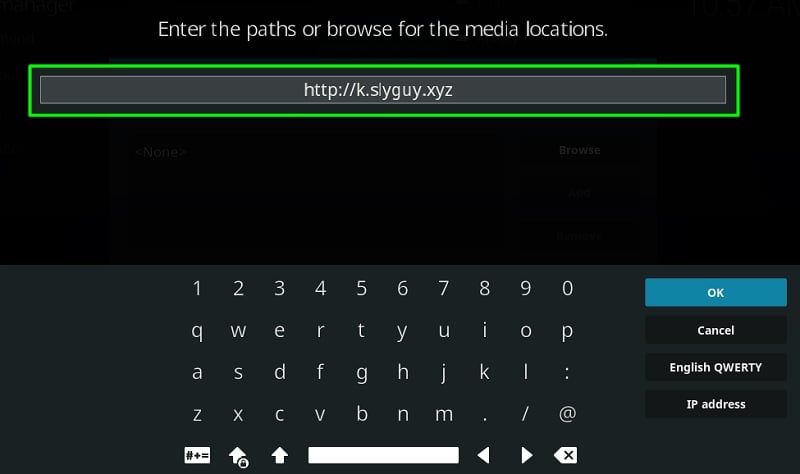
- Click OK to save the link and return to the pop-up window.
- Select the next ‘media source name’ field in the window, type in “Slyguy” and click OK to save the name.
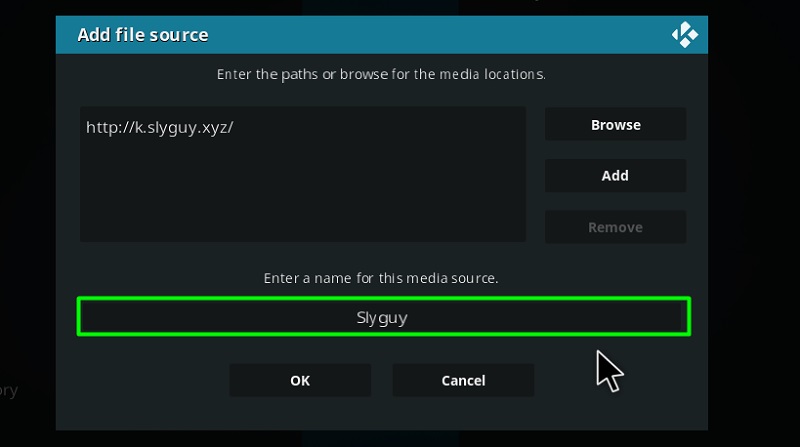
- Now click OK under the pop-up window once again to save the source.
- Go back to Kodi’s System page to select the Add-ons It will redirect you to the Add-on browser page.
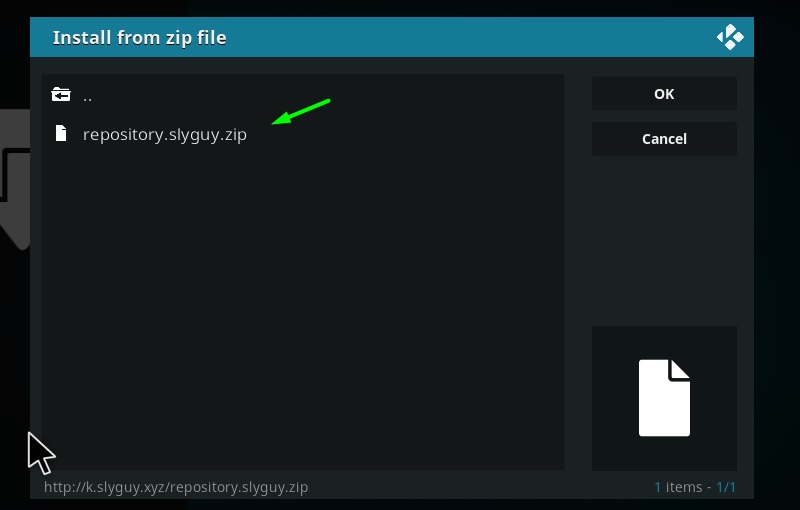
- Select Install from zip file on the following page, then select Slyguy from the source list.
- You will find a single file in the root directory, which is labeled as slyguy.zip. Clicking the zip file will bring you back to the Add-on browser page. In a few seconds, a notification will confirm the installation of the SlyGuy Repository.
Now that you successfully installed SlyGuy Repository on Kodi, proceed to the final set of steps below to install the unofficial Disney+ Kodi add-on.
Step #3: Install Disney Plus Kodi Addon
- On the Add-on browser page, scroll down and click Install from repository.
- A list of Kodi repositories should show up. Select SlyGuy Repository from the list.
- After that, select Video add-ons, then find the Disney+ add-on.
- Once you select it, click Install.
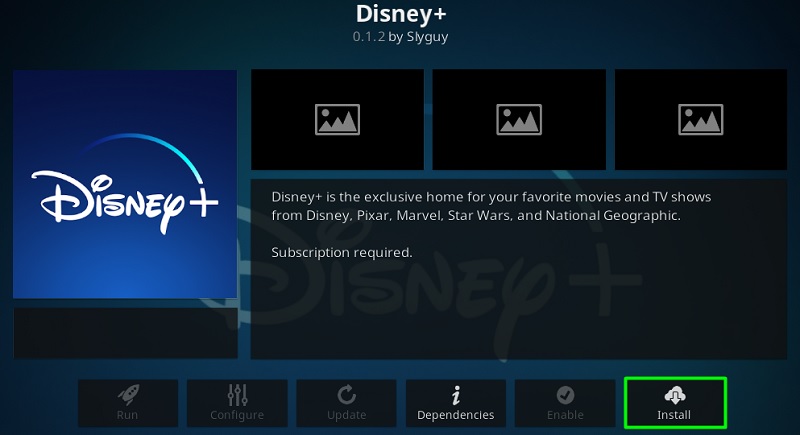
- Kodi will prompt you again to confirm the installation of additional SlyGuy scripts, which will be needed for the Disney+ add-on to function properly. Click OK to proceed.
When you receive the “Disney Plus Add-on Installed” notification, return to the Kodi home screen and select the Add-ons option. From there, you can find launch the Disney+ add-on under Video add-ons.
Guide to Log-in to the Disney Plus Kodi Addon
Assuming that you have already registered for a Disney+ account and a subscription, you can easily log in to the Disney+ Kodi add-on by following these steps:
- Launch the Disney+ add-on on Kodi.
- Click the Login You will be asked to enter your email and password, which you have used to sign up for the Disney+ account.
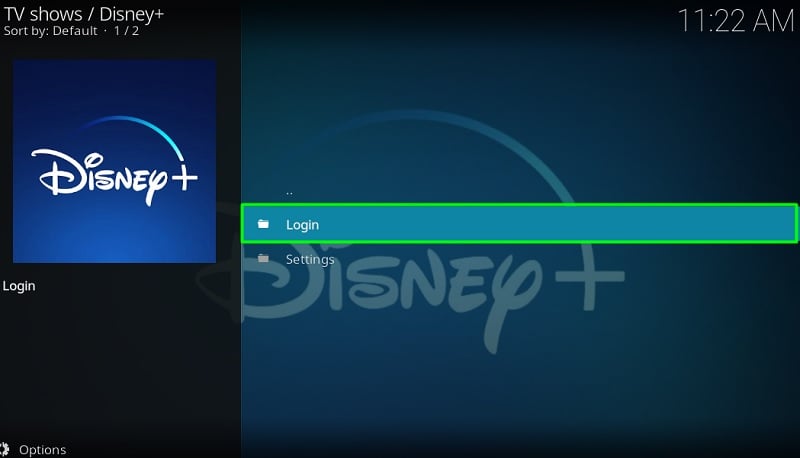
- If you have entered the account credentials correctly, then you will be asked to select a profile.
That’s it! You should see different categories on the home screen of the Disney+ add-on. Now you can select your preferred movie/series and start watching.
If you haven’t signed up for a Disney+ subscription yet, visit disneyplus.com to register for an account and purchase a subscription.
Overview of the Disney+ Kodi Addon
After you log in, you can browse between several different categories on the home screen of the Disney+ add-on. It includes Featured, Movies, Series, Originals, and Search.
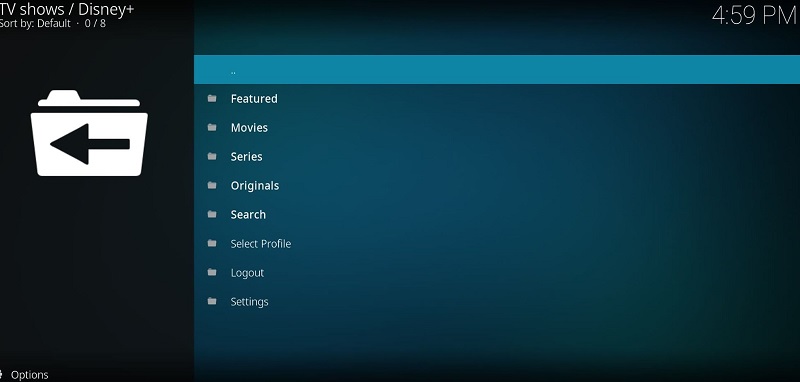
In the Featured menu, you will find sub-categories, such as Disney, Pixar, Marvel, Star Wars, National Geographic, Recommended, Documentaries, Collection, Shorts, Disney Junior Series, and many more. The Continue Watching option will let you continue watching a movie/series exactly from where you previously left it off.
Movies and Series also have their sub-categories, which are Action/Adventure, Animation, Comedy, Drama, Kids, Ultra HD and HDR, etc.
The Select Profile option on the home screen will let you change between your Disney+ personalized profiles. Clicking the Logout option will log you out from your Disney+ account.
From the Playback options in Settings, you can select Playback Quality, as well as enable H265, HDR10, and Dolby Vision on supported hardware.
Most of the Kodi users are installing the illegal Kodi addons and builds on their device. The content provided by such addons is fetched from various streaming sources available on the internet. Everything you stream on Kodi is traceable by your Internet Service Provider and government as well. It’s possible that you might end up in trouble if you stream copyrighted content on Kodi using third party addons.
Thus, we highly recommend Kodi users to make use of IPVanish VPN for streaming content using third party addons on Kodi. IPVanish is the most secure VPN app that lets you freely browse and stream any type of content on Kodi. IPVanish does not store any traces or log files, therefore, it’s the best VPN app we advise all our users to go with. I’ve been using IPVanish for quite some time and experience so far has been flawless.
Go ahead with the below steps to get started with a VPN Protection.
- Get the IPVanish Subscription from Here.
- From there download IPVanish VPN app on your device
- Open the app, select your desired server from the available list and click on connect. That’s it!
In a few seconds, your connection will be secure and private on the internet. You can now freely browse and stream content using any third party addons on your Kodi App.
Related:
Fix Disney+ Playback Error on Kodi
If you are using Kodi v18.x Leia on an Android device, then you might encounter an error message when trying to play a movie, series, or documentary from the Disney plus addon.
Since Kodi on Android can playback Widevine L3 content only, the unofficial Disney+ add-on is currently not working on the Android version of Kodi Leia. The add-on requires the 2.4.4 revision of the Inputstream Adaptive add-on, which is exclusively available for Windows and macOS at the time of this writing.
However, an update in the near future is supposed to fix this error for Kodi Leia on Android devices. For now, you can do nothing but wait for the update to be rolled out soon.
Wrapping Up
If you don’t have access to the official Disney+ streaming app, then this add-on is an excellent alternative for streaming Disney+ content on your devices. You can follow this Kodi guide to install the unofficial Disney Plus addon on Kodi Leia, as well as learn more about the add-on in detail.