Millions of people use Kodi not only for its versatility and powerful customization features but also for its compatibility with various third-party streaming add-ons. One of the many popular streaming add-ons is called cCloud TV Addon. It transforms Kodi to an IPTV service and gives you access to popular live channels from the US and Canada. You don’t have to pay for an expensive monthly package as cCloud TV add-on is completely free-to-use.
If you are still stuck with cable TV subscription, now is the time to cut the cord and switch to cCloud TV. Continue reading this guide to install cCloud TV addon on Kodi and enjoy live TV.
Before we go through the installation process, let’s take an overview of cCloud TV on Kodi.
Table of Contents
cCloud TV Add-on (Overview & Features)
cCloud TV is an open-source cloud-based social IPTV service and one of the most reliable third-party live TV streaming add-ons for Kodi. It is developed by a large number of volunteers from various IPTV forums. The service is constantly updated and new channels are added on request. It offers 1000+ live TV channels from different genres including entertainment, family, movies, infographic, news, sports, and many more. The video streams are mostly maxed out at 720p, with some HD channels are available to watch in 1080p Full HD quality.
A couple of months ago, a third-party Kodi repository named Fusion Repository was shut down because of copyright claims. cCloud TV was exclusively available on that repository, so it was also removed. But it has returned and is available to install from the popular Kodil repository. Now take a quick glance at the feature sets of cCloud TV on Kodi below.
Related – How to Install Ares Wizard on Kodi
Features
- 1000+ Live TV channels including most of the popular entertainment, sports, and news channels from the US and Canada. Check here (https://bit.ly/31OBhmh) to see the list of a few popular channels available on cCloud TV.
- On-demand movies and TV shows (in BETA and not available in every country).
- Hosts HD video streams, with a few channels maxing out to 1080p.
- You can start watching live TV channels without any membership or subscriptions.
- Simple GUI with all the live channels organized into different categories.
Please keep in mind that whatever content you’re streaming on Kodi is clearly visible to your Internet Service Provider (ISP) and local authorities of your region. Kodi addons & builds offer unlimited free streaming but could also get you in legal trouble if your ISP & government found copyrighted content (Movies/TV Shows/Sports) on your Kodi. Therefore, you must be cautious and use a secure connection while using Kodi.
A VPN will help you in masking your IP address, making it impossible for anyone on the internet to track down your online activities. Not only it helps you maintain your anonymity on the Internet, but it also lets you unblock geo-restricted content. Well, there are quite a lot of VPNs available on the internet to choose from. However, the only one we believe to reliable and wholeheartedly recommend is the IPVanish VPN for Kodi.
IPVanish VPN is one of the most secure and fastest VPN in the industry. Moreover, IPVanish VPN comes with a 30-day money-back guarantee. Click here to Get 46% off IPVanish VPN.
This offer will expire soon.
How to Install cCloud TV Addon on Kodi
If you are running Kodi v17.6/18.x or newer, it is very easy to install cCloud TV on your Kodi. But you have to change some advanced settings in order to install third-party add-ons from unknown sources. Even though the setup process is pretty straightforward, the guide can get a little bit confusing. So make sure to follow the step-by-step instructions correctly below.
- To get started, launch the Kodi application on your device.
- Then select the cogwheel icon above the left sidebar to open Kodi’s System configurations menu.
- After that, select System Settings from the options grid. If you are using Kodi v18.x builds, select System.
- Next, select Add-ons from the left sidebar.
- Toggle on Unknown Sources under the General section and click Yes when you get the warning prompt.
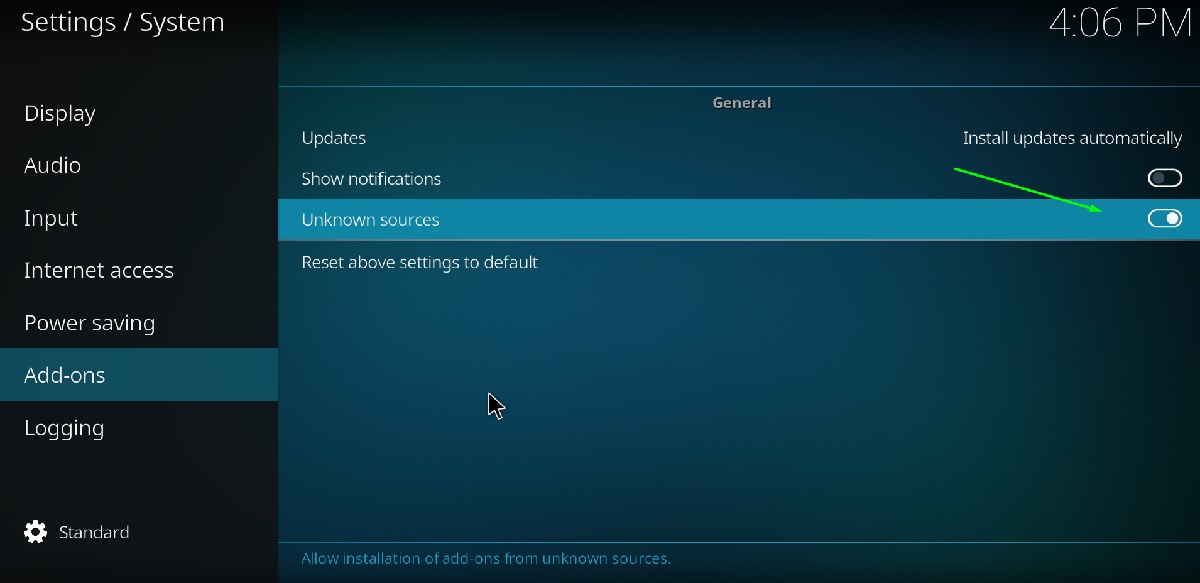
You can now install third-party add-ons on Kodi from unknown sources. Just return to Kodi’s home screen and carry on to the next steps for installing cCloud TV add-on.
- Again click the cogwheel icon in the left sidebar to open Kodi’s System configuration menu, then select File Manager from the list of options.
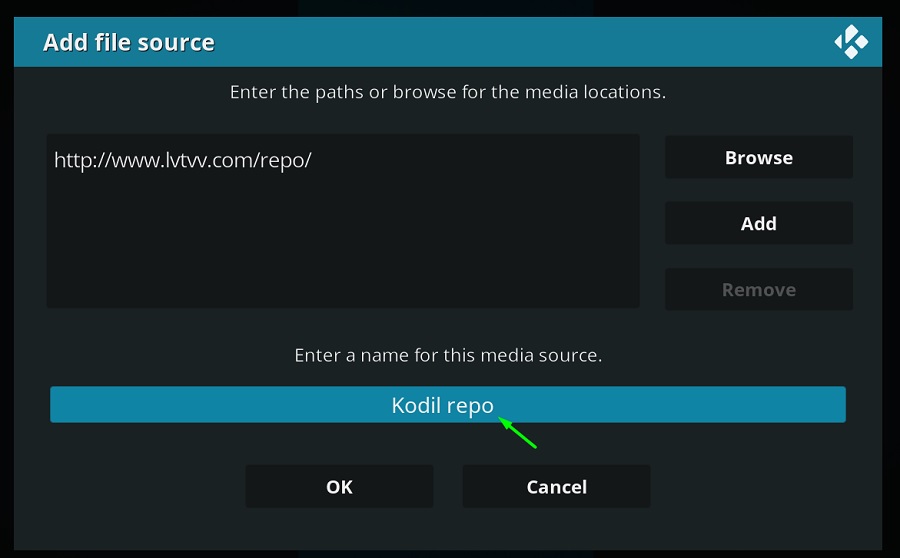
- Select Add source from the right side menu. A window overlay will pop up on the screen.
- Click <None> under ‘Enter the paths or browse for the media locations.’
- Now use the on-screen keyboard to enter the following URL: http://www.lvtvv.com/repo/ and select OK once you are done.
- Type “Kodil Repo” in the text field under ‘Enter a name for this media source’, then save the changes by clicking OK.
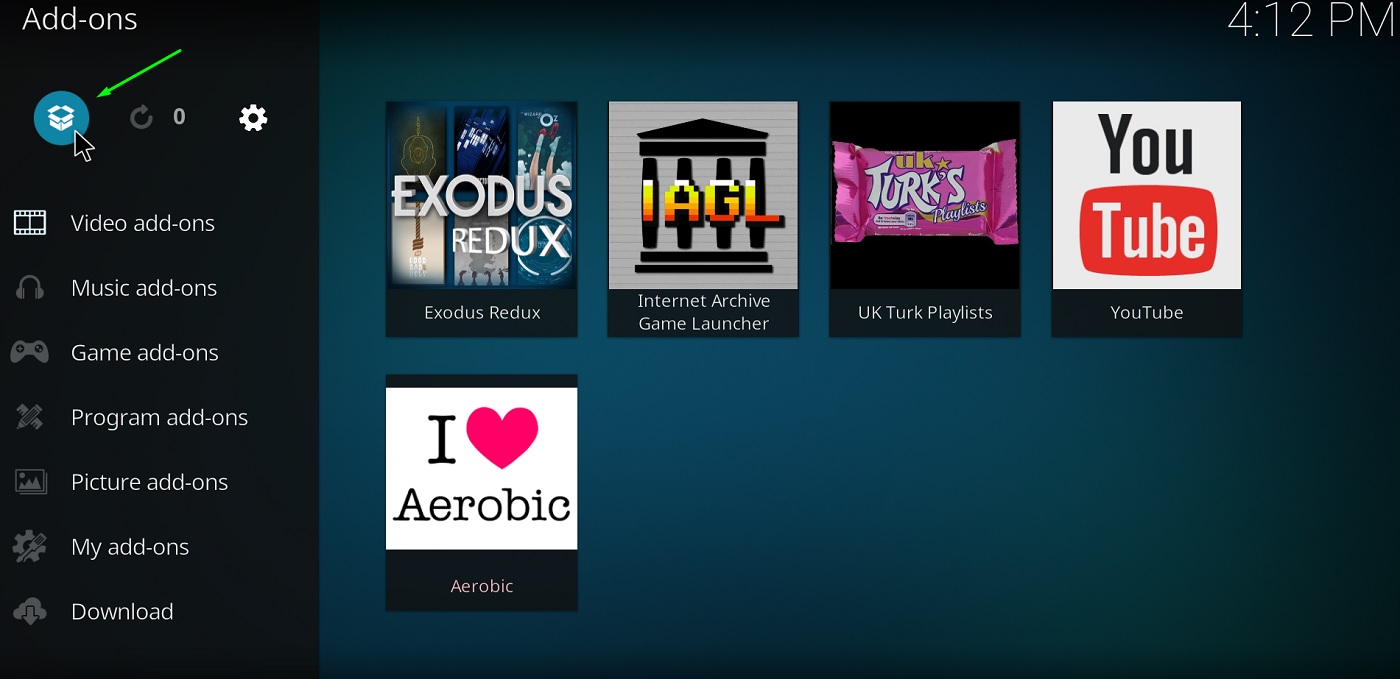
- Return to the Kodi home screen and head over to the Add-ons page from the left sidebar.
- Select the box-shaped icon on the top-left corner of the sidebar.
- Choose Install from zip file on the next page.
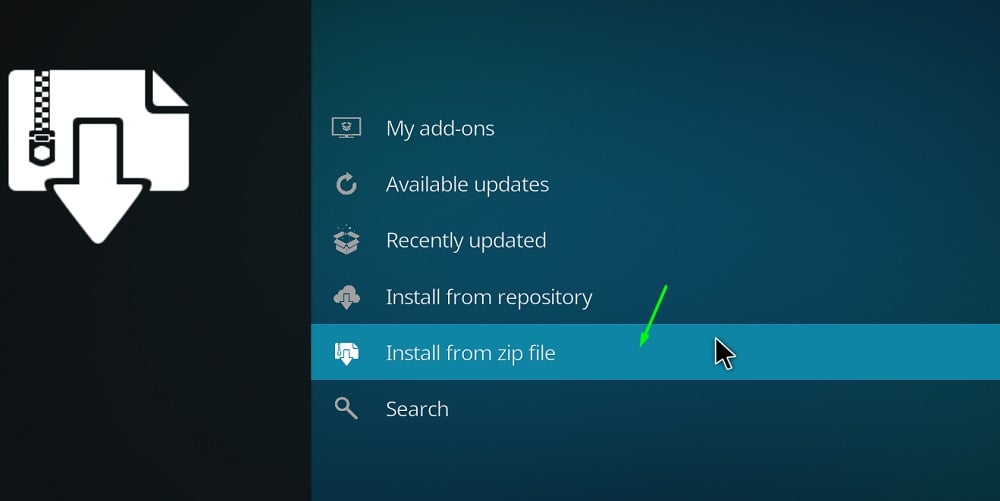
- You will see Kodil Repository in the list of options. Click it or follow Step 4 again in case you don’t see the option.
- Select kodil-1.3.zip. The repository will be installed on Kodi in a few seconds. A pop-up notification will show up on the top-right corner once the installation finishes.
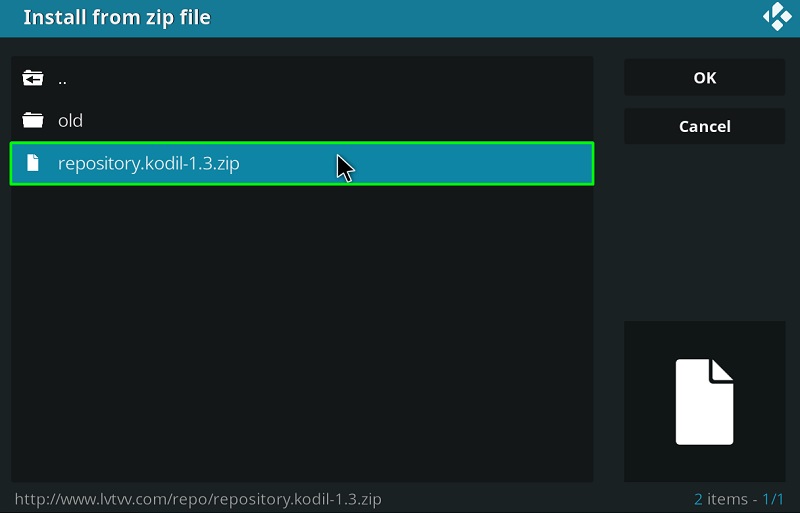
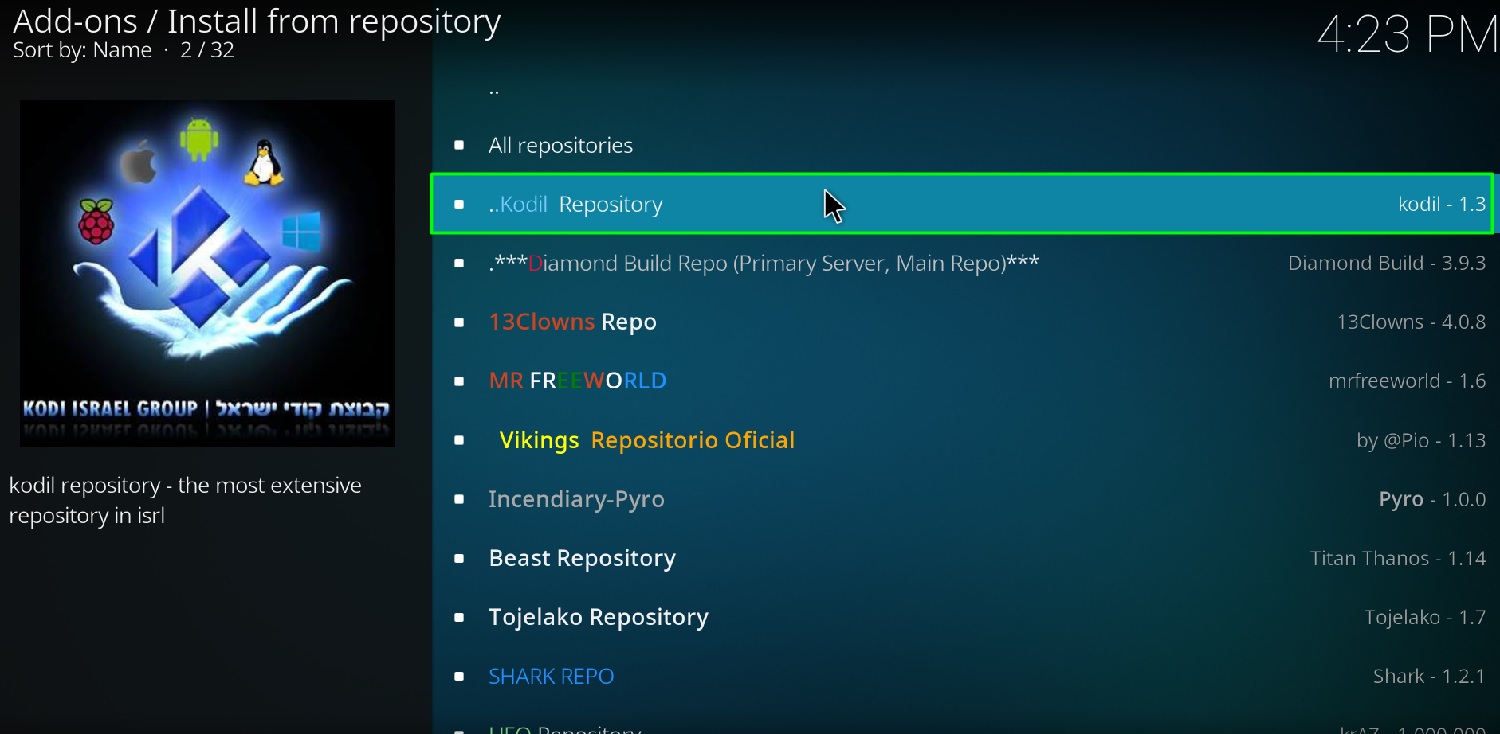
- Return to the Add-ons / Add-on browser menu and select Install From Repository.
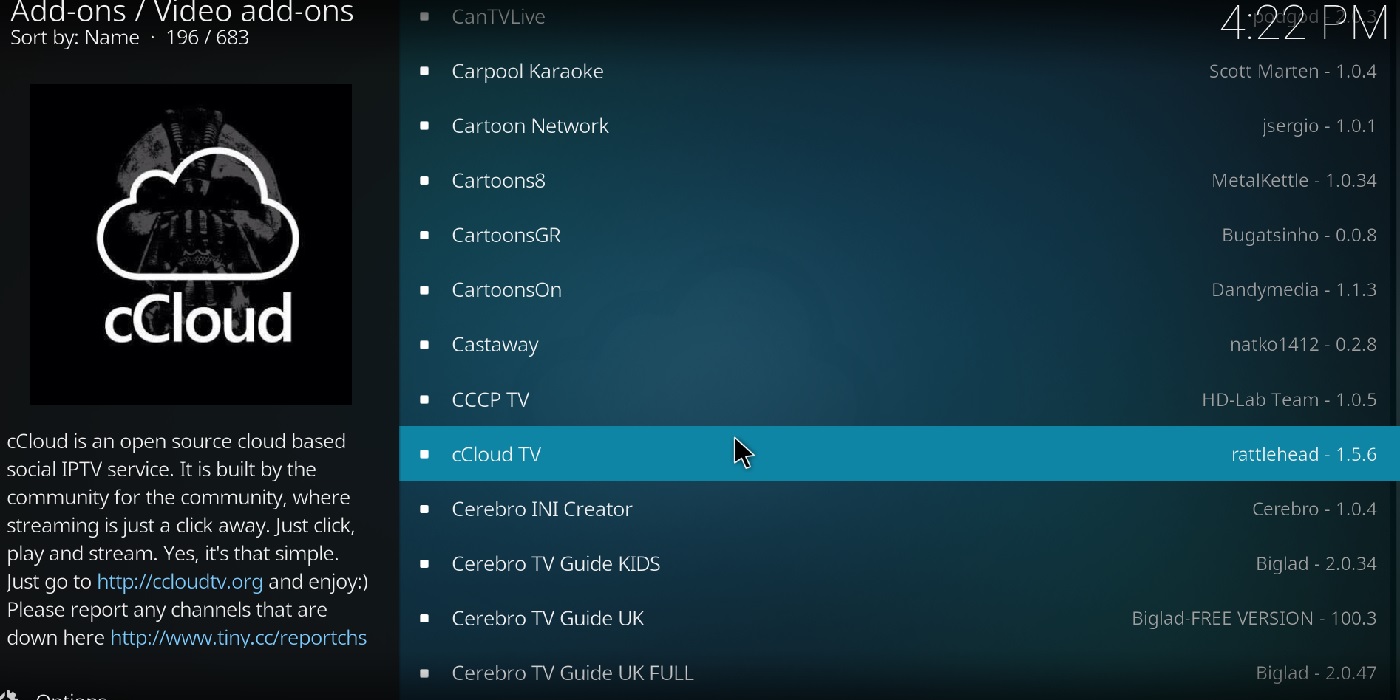
- Choose Kodil Repository, then select Video add-ons on the next page.
- Scroll down a bit to find cCloud TV
- Click Install and then click OK to install the add-on and additional Kodi dependencies your Kodi build.
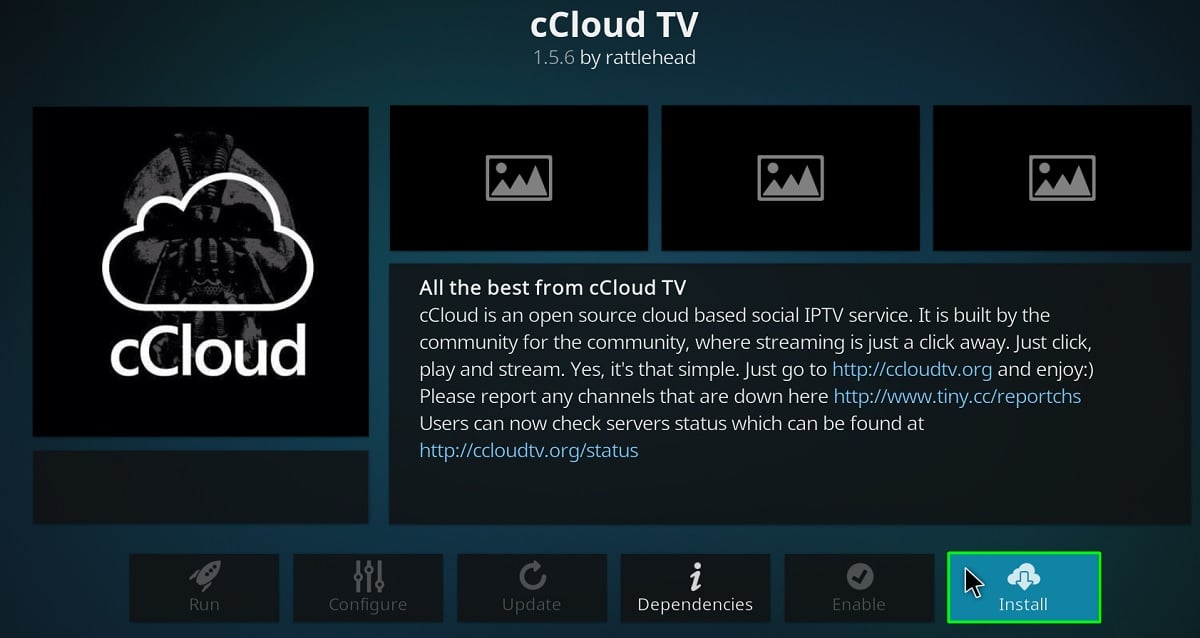
You can now launch cCloud TV from the Video Add-ons section in the Kodi Add-ons page and enjoy your favorite live TV channels.
Final Words
In this guide, we have given a detailed overview of cCloud TV on Kodi and discussed its various features. We have also provided a step-by-step walkthrough to help you install the cCloud TV add-on on Kodi. Also, this guide applies to all the officially supported Kodi platforms including Windows, macOS, Linux, Android, iOS and more.