In this tutorial, I will demonstrate how to install Covenant Addon On Kodi. The same instructions also work on Amazon Firestick, Android TV Box, Windows, MAC PC, Firestick 4k, Fire TV cube and any device running the Kodi software.
Covenant addon is a fork of Exodus, which is primarily used for streaming various types of media content over the internet by a lot of Kodi users. Despite being a fork, the addon manages to outperform the majority of the contenders in the competition. Covenant addon is very effective in terms of gathering a significant number of content and streaming links from various internet websites where the content is stored and delivers the same straight to the user for easy access.
The add-on fetches streaming links from both official and unofficial content providers, which makes it a reliable option compared to other addons. In addition to this, you will also have the option to turn off certain content providers if you want the links to be fetched from official sources only. Overall, the addon does a fine job in terms of delivering the requested content such as Movies, TV shows, Documentaries, Animated Programs, etc to the user for free of cost.
I wholeheartedly recommend covenant Kodi addon to those who are looking to stream media content using Kodi. You would be blown away simply by seeing the vast array of content library that comes with Covenant Kodi addon. In this tutorial, I’ll be sharing a straightforward yet simple to understand walkthrough on how to install Covenant addon on Kodi without any complications.
Table of Contents
How To Install Covenant Addon On Kodi
Please keep in mind that whatever content you’re streaming on Kodi is clearly visible to your Internet Service Provider (ISP) and local authorities of your region. Kodi addons & builds offer unlimited free streaming but could also get you in legal trouble if your ISP & government found copyrighted content (Movies/TV Shows/Sports) on your Kodi. Therefore, you must be cautious and use a secure connection while using Kodi.
A VPN will help you in masking your IP address, making it impossible for anyone on the internet to track down your online activities. Not only it helps you maintain your anonymity on the Internet, but it also lets you unblock geo-restricted content. Well, there are quite a lot of VPNs available on the internet to choose from. However, the only one we believe to reliable and wholeheartedly recommend is the IPVanish VPN for Kodi.
IPVanish VPN is one of the most secure and fastest VPN in the industry. Moreover, IPVanish VPN comes with a 30-day money-back guarantee. Click here to Get 46% off IPVanish VPN.
This offer will expire soon.
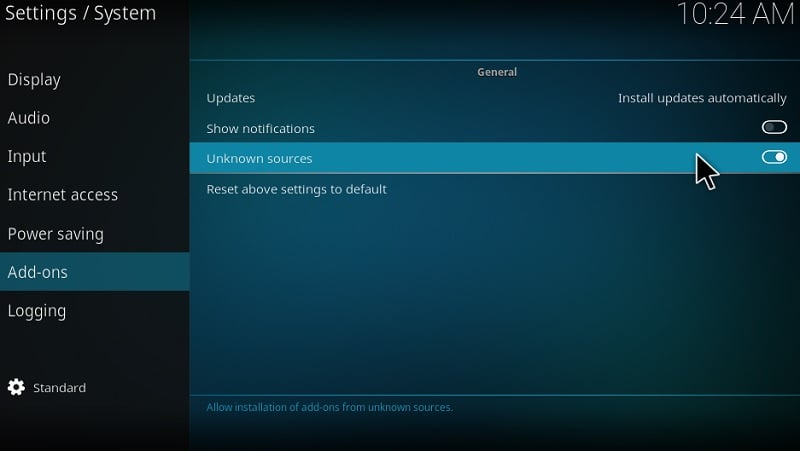
Since covenant addon is coming from a third party source/developers, you must ensure that the “Unknown Sources” option is turned ON on your Kodi before proceeding with the installation process. Go ahead with the following steps to enable the option.
- Open up the Kodi app and Go to the Settings menu by clicking on the Gear icon.
- Navigate to System Settings or System Menu on the next screen to proceed.
- Hover your cursor on Add-ons option to open up its context menu on the right side.
- Now find the “Unknown Sources” option and make sure to enable it by toggling.
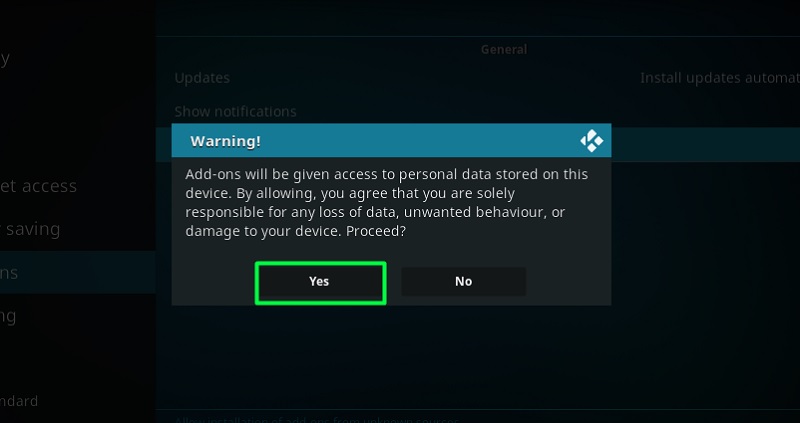
- Kodi will show a warning message in order to confirm the changes.
- Click on ‘Yes” to get past the popup window and press the back button to exit the Settings Menu.
You will now be able to install any addon or builds from third-party developers on your Kodi app without any restrictions. The steps of installing covenant addon are as follows:-
- Go to the Settings menu again by clicking on the gear icon from the home screen.
- Open File Manager Menu and select Add Source option, located in the right corner.
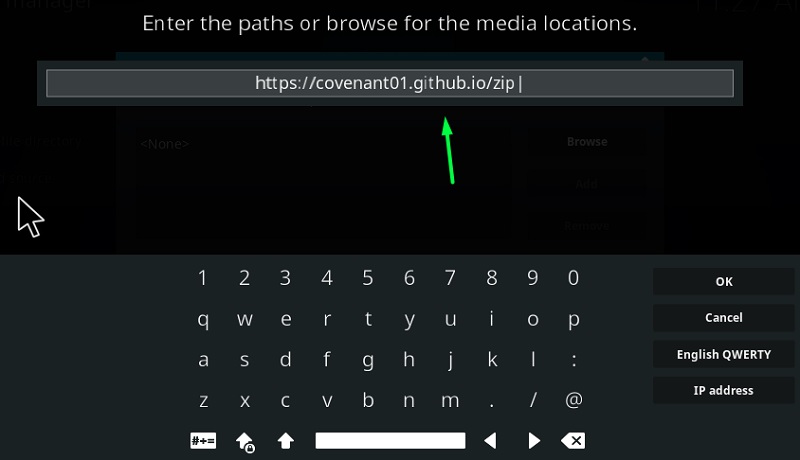
- A pop-up menu will appear on your screen, select NONE text and paste the following URL in place of it. [https://covenant01.github.io/zip] Confirm the URL is correct before proceeding.
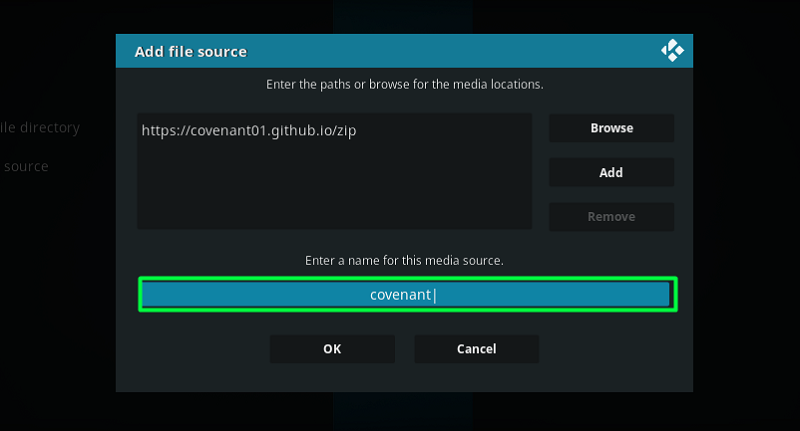
- In the following field, type Covenant as the name for the above source link and hit OK option.
- Navigate back to the Main Menu and Click Add-ons option from there to proceed further.
- Click on Package Installer Icon on the next screen and select Install From Zip File option over there.
- Select Covenant then hoose repository.covenant-zip option and hit OK.
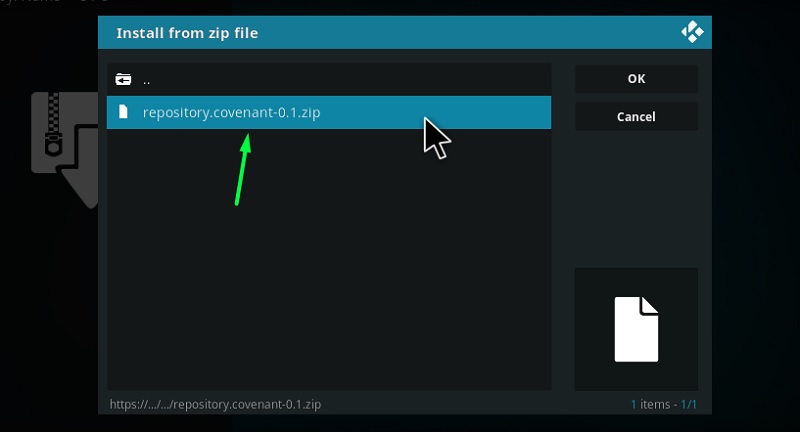
- Now, wait for the successful repo installation notification to appear on your screen before proceeding.
- After the repo is successfully installed, click on Install From Repository option from the same menu screen.
- On the next step, select Covenant Repository.
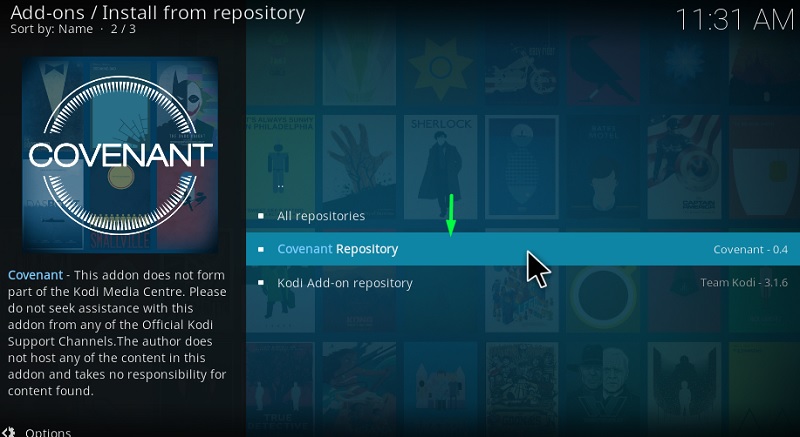
- Choose Video Add-ons.
- Now Select Covenant folder, Open it up and click on Install option to begin the installation process.
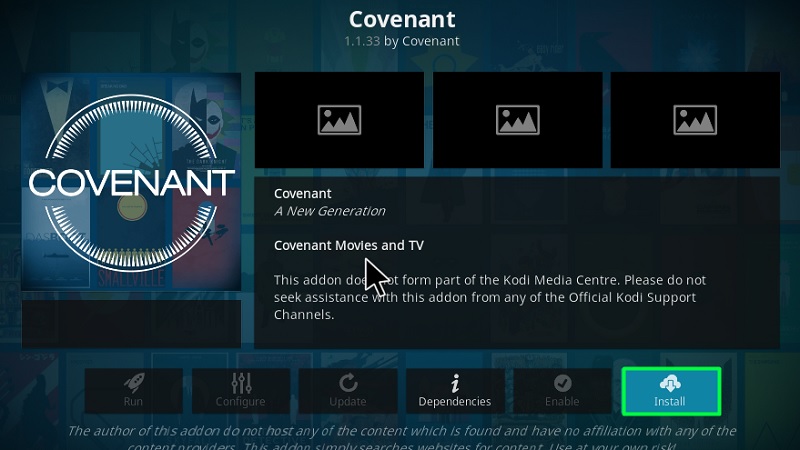
- Click ok if you Get “The following additional add-ons will be installed” message
The installation steps are now complete, the only thing you need to do now is wait for the installation notification to appear on your screen. Once the installation is complete, you will be able to find the Covenant addon by going into Add-ons -> Video Addons from the home screen itself. Go through the following section to know trivial information about the addon and how to make effective use of it.
How To Use Covenant Kodi Addon
You will receive a popup window showing the new updates and the changes that have been made in the current version. Simply click on the background or drop-down arrow to get past the pop-up window. On the home screen, you will find tons of main categories such as Movies, TV shows, Scraper Tools, Settings, etc. to proceed further.
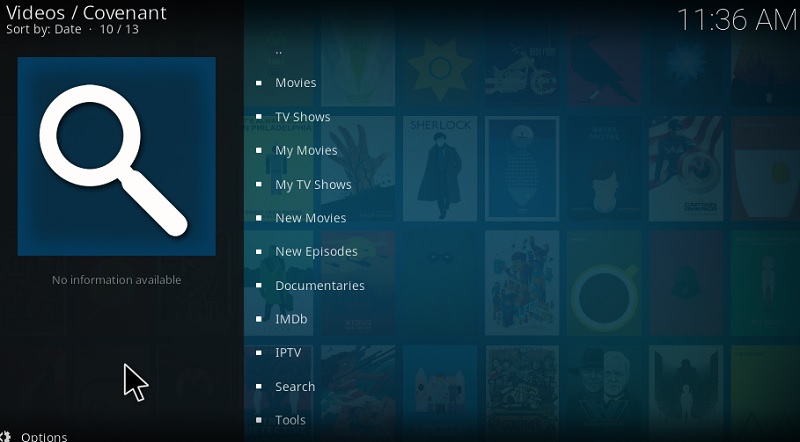
Simply select the category depending on what you would like to watch and related content will be provided on the next screen. You can find a short synopsis of the movie or TV show that you selected if you’re unsure about it. Upon selection of the Title, the addon will start fetching streaming links from various sources. On the next screen, you just have to select a source and the stream will begin within a few seconds.
In case if you receive any errors such as No Streams Available then go back to the sources list and try again by selecting any other stream quality link from the list. Also, make sure to keep the addon up to date for the best streaming experience.
How To Integrate Real Debrid Account
Covenant addon comes with real debrid integration support which would make your streaming experience amazingly fast. By connecting a real debrid account, you will be able to instantly stream media content from anywhere without compromising in terms of speed. If you have a real debrid account, then follow the below-mentioned steps to integrate it with the covenant addon.
- Go to Real Debrid official site to create your account, in case if you’re a new user.
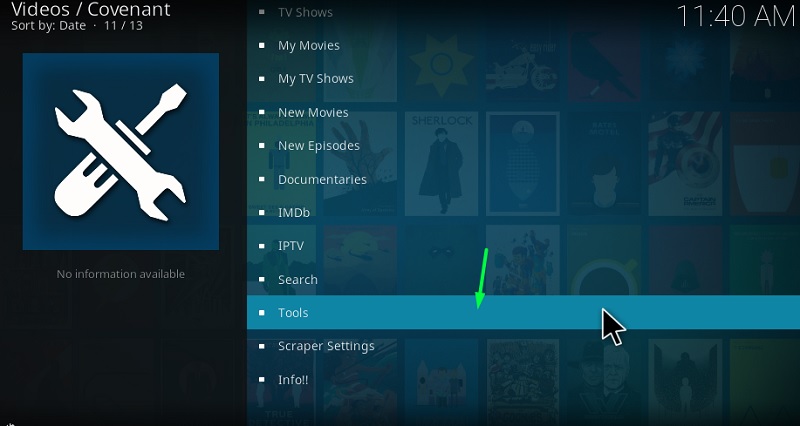
- Open the Covenant add-on and head over to the Tools option located at the bottom of the menu list.
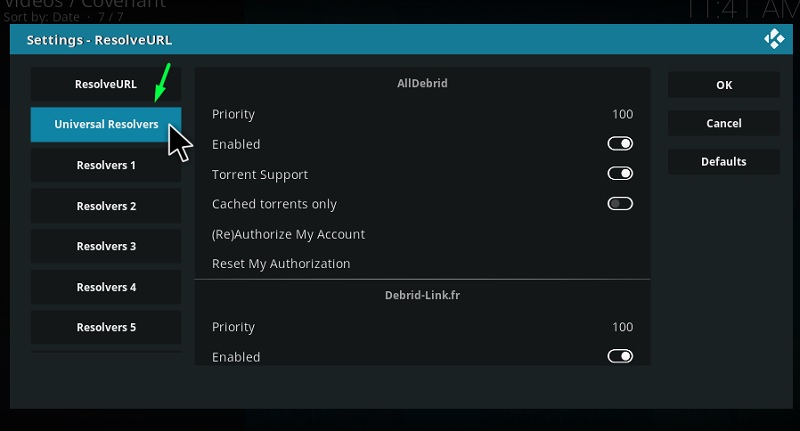
- Now select Resolve Settings on the next screen and click on Universal Resolvers option.
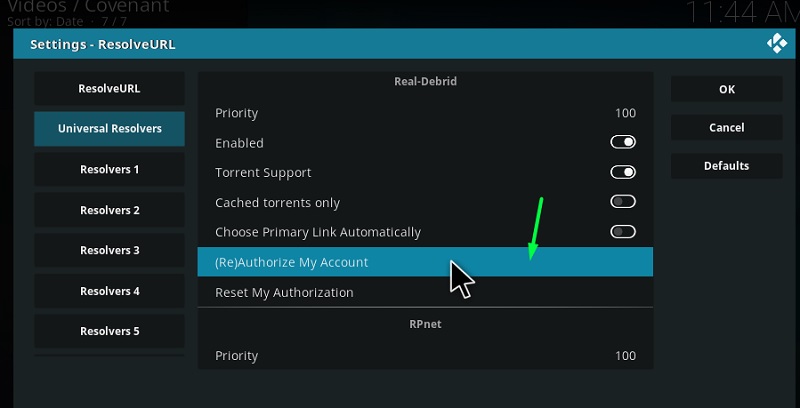
- Scroll down, find real-debrid & Click on Reauthorize My Account.
- A pop window to show up on your screen. Make note of the code shown in the window.
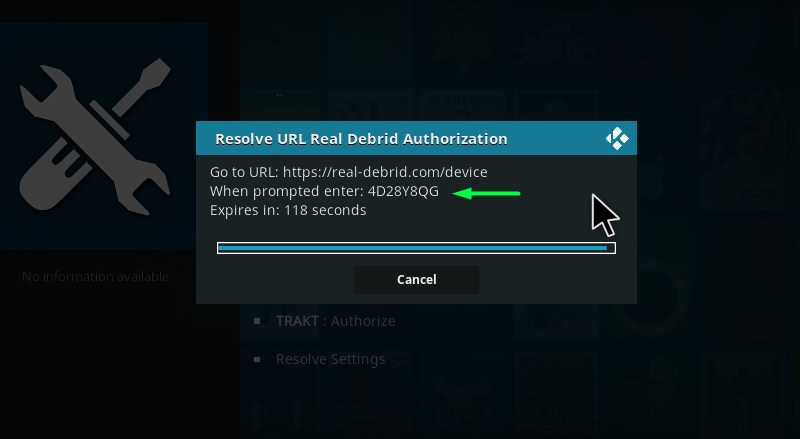
- Go to https://real-debrid.com/device.
- Now enter the provided code on the web page to confirm your real debrid integration.
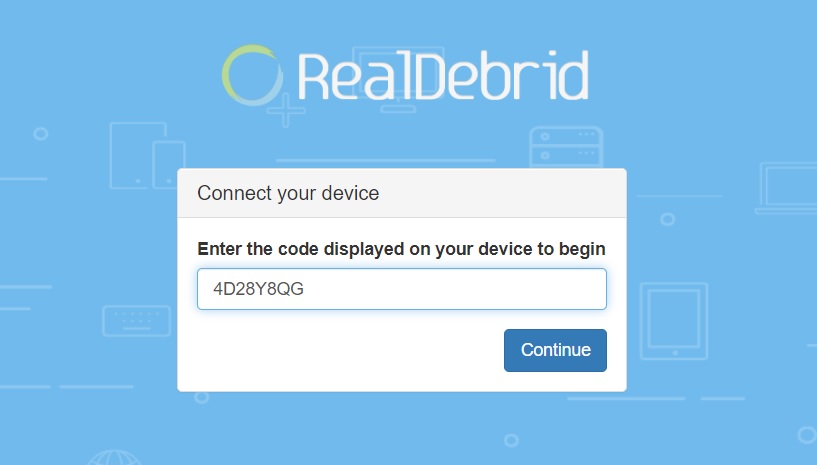
Upon entering the right code, you will be shown an approved message on the web page. You may now open up the addon and select any movie or TV show title to start seeing real debrid streaming links.
Related Posts
- How To Install Venom Addon on Kodi
- How to Install Diggz Xenon Kodi Build
- How To Install No Limits Magic Build on Kodi
Bottom Line
Covenant addon is one of the best video streaming addons, hands down without a doubt. Since it uses both official and unofficial sources for content fetching, you will always have something new to watch in your free time. You no longer have to worry about running out of options to watch with Covenant Kodi addon. I highly recommend giving the addon a shot, especially if you’re a real debrid user. All the effort and time is worth spending when you’re getting access to an endless list of media content such as Movies and TV shows.
In case if you any further help or stuck anywhere in the installation process, then let me know in the comment section below. I hope you have found the article to be useful and make sure to share it with others who might need it!